Manage Release Notes and Versioning automatically with Release Drafter GitHub Action
If your project is hosted on GitHub, there's an awesome way to automate how your Releases are created.
With Release Drafter GitHub Action you can automatically:
- label your Pull Requests based on their titles
- bump the Release version based on PRs labels
- create a Release draft as PRs get merged
- fill the Release Notes with the title/author/ID of the merged PRs
As all these steps are done automatically, the Release notes are going to be properly filled. Like in this example:
Once the Release draft is populated, publishing a it is just a matter of clicking some buttons in the web interface.
This can be specially useful if you want to enforce Semantic Versioning in your project.
Requirements
I'm assuming you're familiarized with these concepts:
- How Semantic Versioning works
- GitHub specific concepts:
It's also good to use titles for your PRs similarly to what is recommended for conventional commits
Release Drafter overview
In general Release Drafter work like this:
- once a PR is opened
- its title is used to automatically set a label
- a new Release draft is created, if it doesn't exist.
- once the PR is merged
- its title/author/ID is added to the Release Notes
- the Release version is bumped depending on the PR label
One of the best features of Release Drafter is the way it bumps the Release version based on the labels.
As you may remember, Semantic Versioning works like this:
Given a version number MAJOR.MINOR.PATCH, increment the:
- MAJOR version when you make incompatible API changes
- MINOR version when you add functionality in a backward compatible manner
- PATCH version when you make backward compatible bug fixes
Additional labels for pre-release and build metadata are available as extensions to the MAJOR.MINOR.PATCH format.
And we can configure which label causes a bump in which kind of version number (either MAJOR, MINOR or PATCH).
Examples:
- a PR with the
fixlabel bumps thePATCHnumber - a PR with the
featurebumps theMINORnumber - a PR with the
BREAKING CHANGElabel bumps theMAJORnumber
Using Release Drafter
NOTE: It's always recommended to check the official documentation.
Calling the Action
First let's create the .github/workflows/release-drafter.yml:
# Drafts next Release notes as PRs are merged into "main"
# see: https://github.com/marketplace/actions/release-drafter
name: Release Drafter

on:
  push:
    branches:
      - main
  pull_request:
    types: [opened, reopened, synchronize, labeled, unlabeled]

permissions:
  contents: read

jobs:
  update_release_draft:
    permissions:
      # write permission required to create a github release
      contents: write
      # write permission required for autolabeler
      pull-requests: write
    runs-on: ubuntu-latest
    steps:
      - uses: release-drafter/release-drafter@v5
        with:
        # this file MUST be relative to '.github/'
          config-name: release-drafter-config.yml
        env:
          GITHUB_TOKEN: ${{ secrets.GITHUB_TOKEN }}
Note: this 👆 file is just calling the action and configuring which events will trigger the action. The actual release-drafter configuration is in a different file.
Look at the config-name property near the end of the file. That's the name of the file we're going to use for configuration.
The configuration file
From the docs: The configuration file MUST reside in your default branch, no other configurations will be accepted.
The most simple configuration possible would be something like this:
template: |
  ## What’s Changed

  $CHANGES
That would be enough to create a basic Release notes based on PRs getting merged. That would look kinda like this:
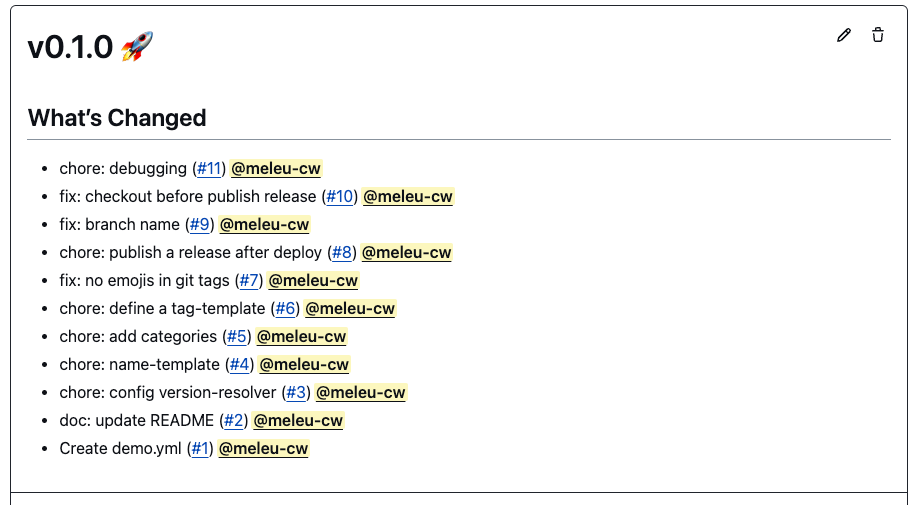
As you can see, that's not enough to have all the automation I promised you at the beginning of this article.
I'm gonna share here a fancier configuration trying to explain some stuff in the comments. If you need more info, please check the official documentation.
Always keep in mind that labels play an important role here! The labels that doesn't exist you'll need to create manually on GitHub's interface.
This is the .github/release-drafter-config.yml:
# For more information about release-drafter configs, see:
# https://github.com/marketplace/actions/release-drafter#configuration
# release title (appears, for example, in repo's sidebar)
# NOTE: $RESOLVED_VERSION == $MAJOR.$MINOR.$PATCH
name-template: "v$RESOLVED_VERSION"
# git tag to be used for the release
tag-template: "v$RESOLVED_VERSION"
# Release Notes template (keep it as is)
template: |
## What’s Changed
$CHANGES
# Define which PR label will cause which kind of
# version bump (following semantic versioning).
# If no labels match, the default "patch".
version-resolver:
major:
labels:
- "major"
- "BREAKING CHANGE"
minor:
labels:
- "minor"
- "feature"
- "enhancement"
patch:
labels:
- "chore"
- "documentation"
- "bug"
- "fix"
- "refactor"
- "dependencies"
default: patch
# Define which PR label will be listed in which
# category of changes in the Release Notes.
# If no labels match, the default is to be
# listed on the top, before the sections.
categories:
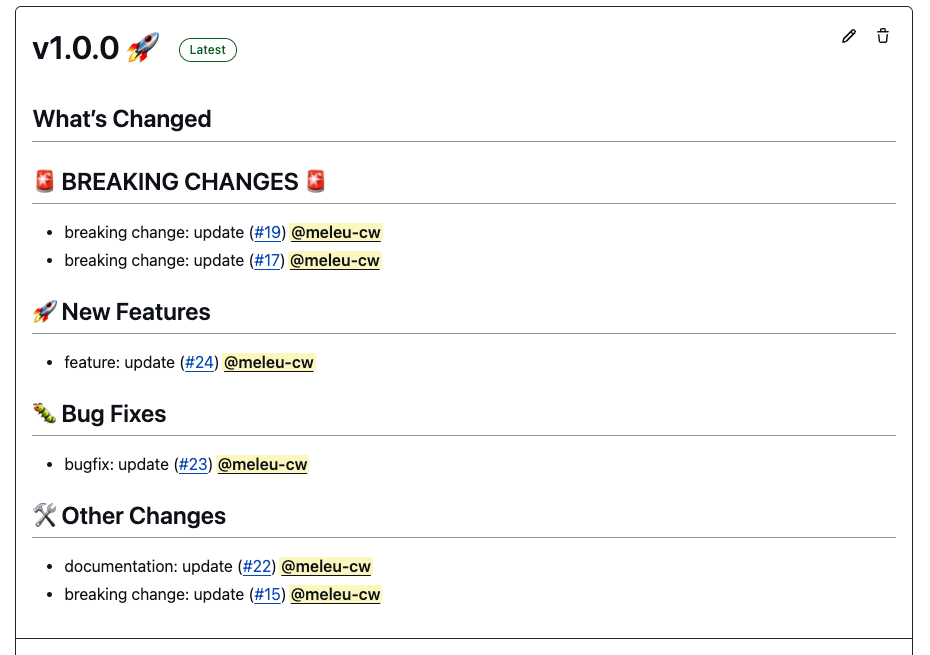
- title: "🚨 BREAKING CHANGES 🚨"
labels:
- "BREAKING CHANGE"
- title: "🚀 New Features"
labels:
- "feature"
- "enhancement"
- title: "🐛 Bug Fixes"
labels:
- "fix"
- "bug"
- title: "🛠️ Other Changes"
labels:
- "chore"
- "refactor"
- "documentation"
- "style"
- "test"
- "revert"
- "dependencies"
- "ci"
# This is an important part! The autolabeler is what
# sets the label to your PR based on the PRs title.
autolabeler:
- label: "BREAKING CHANGE"
title:
- "/breaking change/i"
- label: "chore"
title:
- "/^chore/i"
- "/^style/i"
- label: "documentation"
title:
- "/^doc/i"
- label: "fix"
title:
- "/^fix/i"
- "/^bug/i"
- label: "ci"
title:
- "/^ci/i"
- label: "refactor"
title:
- "/^refactor/i"
- label: "feature"
title:
- "/^feature/i"
- "/^feat/i"
- label: "test"
title:
- "/^test/i"
- label: "revert"
title:
- "/^revert/i"
Here's an example of Release Notes produced with this config:
Submitting a PR
Once everything is properly configured, you just need to encourage your team to prefix PR titles in a similar way as we do in Conventional Commits.
Examples:
docs: correct spelling of READMEfeat: allow provided config object to extend other configschore: drop support for Node 12BREAKING CHANGE: 'extends' key in config file is now used for extending other config files
Remember:
- the prefix in the PR's title defines which label is going to be automatically set
- the PR's label defines:
- the category the PR is going to be listed in the Release notes (
New Features,Bug Fixes, orOther Changes) - the version bump (major, minor or patch)
- the category the PR is going to be listed in the Release notes (
Publishing a Release
As the name implies, the Release Drafter only creates and updates the Release draft. Publishing the Release is out of its scope.
There are a few ways to actually publish a draft.
The easiest way is to do it via the web interface.
If you're not afraid of terminal, you can publish your Release marked as draft with this command:
# simply edit the release marking the draft flag as false
gh release edit ${ReleaseTag} --draft=false
If you feel brave, you can do even better: find a way to run this 👆 command in a custom GitHub Action.