AWS SAM Framework and AWS Lambda
- https://www.udemy.com/course/aws-sam-framework-and-aws-lambda/
- official docs for AWS SAM Framework: https://docs.aws.amazon.com/serverless-application-model/latest/developerguide/what-is-sam.html
SAM = Serverless Application Model
The AWS Serverless Application Model is a different framework than The Serverless Framework.
3. Development Environment Setup
Setup an AWS Profile
AWS Console -> IAM -> Users -> Add users
- User name:
serverless-admin - Select AWS credential type:
- next ->
- Attach existing policies directly
- next ->
- Tags (do whatever you want)
- next ->
- Confirm create user
Take note of your Access key ID and Secret access key.
Then run:
# apparently it needs the 'serverless' tool to be installed
# check https://serverless.com
serverless config credentials \
  --provider aws \
  --key "${accessKeyId}" \
  --secret "${secretAccessKey}" \
  --profile serverless-admin
Install VSCode and Setup AWS Toolkit
Install VSCode and install the plugin named "AWS Toolkit".
If you're already connected to AWS through the CLI, just run in your VSCode Ctrl+Shift+P and then AWS: Connect to AWS (maybe you'll need to run AWS: Create Credentials Profile, go figure it out).
Install AWS CLI
I've installed on Linux using the instructions here.
curl \
  "https://awscli.amazonaws.com/awscli-exe-linux-x86_64.zip" \
  -o "awscliv2.zip"
unzip awscliv2.zip
sudo ./aws/install
Setting up AWS Configurations
To know which user is logged into AWS, use this command:
aws sts get-caller-identity
If you want to change the user:
aws configure
Install Docker
Recently I've been using the Docker Desktop. But I have these notes about docker installation:
Install AWS SAM CLI
Followed the installations from the docs here.
# installed with brew
brew tap aws/tap
brew install aws-sam-cli
4. AWS SAM Framework in depth
AWS SAM stands for Serverless Application Model, it's used to define your serverless application
AWS SAM consists of the following components:
- AWS SAM Template Specification - you write properties to a file to describe functions, APIs, permissions, etc.
- AWS SAM CLI - to invoke function, packages and deploy serverless applications to AWS Cloud and so on.
AWS SAM CLI aims to ease the pain of creating, deploying managing and debugging lambda functions.
Creating and Running our first AWS SAM Application
# initialize and follow the instructions for a HelloWorld
sam init
# that will create a directory with the name of the app

# assuming the app name is 'sam-hello-world'
# open the project in vscode
code sam-hello-world

# building the project
sam build

# invoking the function locally
sam local invoke
I had this issue to run the function locally (even with Docker Desktop running):
$ sam local invoke
Error: Running AWS SAM projects locally requires Docker. Have you got it installed and running?
Solved following the instructions here in the issue tracker.
# check the docker context
# (it was 'desktop-linux')
docker info | grep -i context

# get the DOCKER_ENDPOINT for 'desktop-linux'
docker context ls

# run the 'sam' command with DOCKER_HOST properly filled
DOCKER_HOST=unix:///home/meleu/.docker/desktop/docker.sock sam local invoke
What was awesome from this technique is that the function was not even deployed to AWS. Everything ran locally!
Deploying the AWS SAM App
sam deploy --guided
Answers used during the course:

After it finishes, test the endpoint created.
Hosting the API locally
sam local start-api
Then test it by sending a GET request to localhost:3000/hello.
Invoke your Lambda Function directly
Check the Resources in the template.yaml file. In this case we want to invoke the HelloWorldFunction:
sam local invoke "HelloWorldFunction"

# in the video he used this
sam local invoke "HelloWorldFunction" -e events/event.json
# I didn't get why exactly the
# '-e events/event.json' is needed
Deleting the Stack
# list the stacks you have
aws cloudformation list-stacks

# delete the one created in the previous sections
aws cloudformation delete-stack \
  --stack-name ${appName}
  --region ${awsRegion}
5. AWS SAM and AWS Toolkit in VSCode
In VSCode, > AWS: Create Lambda SAM Application and follow the instructions on the screen to create a Hello World with Python
It'll create a directory with the app files.
Again, a VSCode command: > AWS: Deploy SAM Application.
In my system, for some reason, that 👆 command is not present. Then I deployed via CLI: sam deploy --guided.
6. AWS SAM Deep Dive - SAM Specifications
sam init
# 1 - quickstart
# 2 - serverless api
# 3 - nodejs16
# n - no X-Ray
# Project name: test-sam-app

# then build the project
cd test-sam-app
sam build
YAML Crash Course
I learned something useful in this lecture: the & and * notations in a YAML file.
Example: this input:
author: &jPaul
  name: James
  lastName: Paul

books:
  - 1923:
      author: *jPaul
  - My Biography:
      author: *jPaul
Generates this JSON output:
{
  "author": {
    "lastName": "Paul",
    "name": "James"
  },
  "books": [
    {
      "1923": {
        "author": {
          "lastName": "Paul",
          "name": "James"
        }
      }
    },
    {
      "My Biography": {
        "author": {
          "lastName": "Paul",
          "name": "James"
        }
      }
    }
  ]
}
AWS Lambda and SAM Framework Core Concepts
- Function
- independent unit of deployment
- best practice: does a single job.
- examples:
- save user to DynamoDB
- convert large image into a thumbnail
- Events
- anything that triggers a Lambda function
- examples:
- API Gateway HTTP endpoints
- S3 bucket upload
- Resources
- infrastructure components used by the Lambda function
- examples:
- DynamoDB Table (saving a comment)
- S3 bucket (saving audio files)
- SNS (sending messages asynchronously)
- Services
- Framework's unit organization (project file).
- Where you define the Functions, the Events and the Resources.
- Can be described in YAML or JSON
AWS Functions Timeout and Memory
Let's define two Lambda functions and tweak the timeout and memory.
sam init
# 1 - template
# 1 - HelloWorld
# Python
# X-Ray: no
# name: sam-time-memory
Go to the hello_world/app.py and add something like this:
# ...
import time

def lambda_handler(event, context):
    time.sleep(4)
    # ...
This will make the function sleep for 4 seconds.
Open the template.yaml and notice that Globals.Function.Timeout is set to 3.
Build and run the function and see it failing due to timeout:
sam build && sam local invoke
You can also set the timeout for a specific function using Resources.${FunctionName}.Properties.Timeout. In fact, this is how to override the value from the Globals.
Play with these values and see what happens.
IAM Permissions for Lambda Functions
By default a Lambda function doesn't have permissions to access other services (example: access to S3 buckets or DynamoDB data). To solve this we need to provide an IAM policy.
In this example we're giving to our function permission to list lambda functions. In the template.yaml we must add this to Resources.${FunctionName}.Properties:
Resources:
  ${FunctionName}:
    Properties:
      Policies:
        Version: "2012-10-17"
        Statement:
          - Effect: "Allow"
            Action:
              - "lambda:*"
            Resource:
             "*"
Environment Variables
Useful to provide external configuration to your functions.
We just need to edit our template.yaml:
# if defined Globals, the variable
# is accessible by all functions
Globals:
  Function:
    Environment:
      Variables:
        KEY: "VALUE"

# you can also define env variables
# at function's level
Resources:
  ${FunctionName}:
    Properties:
      Environment:
        Variables:
          KEY: "VALUE"
VPC for Lambda Functions
VPC = Virtual Private Clouds
Many companies use VPC to privately deploy their applications. By default Lambda functions are NOT launched in a VPC.
You can launch Lambda in your VPC, so it can security access EC2 instances, RDS instances or any other instance in your VPC.
You can also assign security groups to your Lambda functions as well, for enhanced network security!
You can choose to deploy your Lambda function in any subnets you like. This will allow your Lambda function to inherit a private IP from that subnet.
Get the ${subnetID}:
To get the subnet ID go to AWS Console and search for VPC, click on it. Then go to Your VPCs, chose one. Then click on Subnets. You'll see the list of Subnets with their respective IDs
Get the ${securityGroup}:
Also in the VPC screen, left sidebar, Security -> Security groups. Select a security group or create a new one.
Add this to your template.yaml:
Globals:
  Function:
    VpcConfig:
      SecurityGroupIds:
        - "${securityGroup}"
      SubnetIds:
        - "${subnetID}"
AWS SAM and CloudFormation

AWS Lambda Pricing
https://aws.amazon.com/lambda/pricing/
Current pricing, as of Feb 2022:
- Pay per calls:
- Frist 1,000,000 requests are free
- $0.20 per million requests thereafter
- Pay per duration:
- 400,000 GB-seconds of compute time per month FREE
- == 400,000 second if function is 1GB RAM
- == 3,200,000 second if function is 128MB RAM
- you need to understand what your functions need for it to run and adjust accordingly
Moral of the story: it's usually very cheap to run AWS Lambda, that's why it's very popular.
You pay as you go - if your app doesn't use the Lambda functions, or they don't get trigger, then you don't get billed for them!
7. AWS SAM Template Anatomy
# Transform is required
# identifies the CloudFormation template
Transform: AWS::Serverless-2016-10-31

# Globals is optional
# defines common properties to all serverless functions/APIs
Globals:
  # set of globals

Description:
  # String

Metadata:
  # template metadata

# Parameters is optional
# declare values to pass to the template at runtime
# - can refer these from the Resources and Outputs
Parameters:
  # set of parameters

Mappings:
  # set of mappings

Conditions:
  # set of conditions

# Resources is required
# defines all resources for your serverless app
Resources:
  # set of resources

Outputs:
  # set of outputs
AWS SAM Resource Types
AWS::Serverless::Api
AWS::Serverless::Application
AWS::Serverless::Function
AWS::Serverless::HttpApi
AWS::Serverless::LayerVersion
AWS::Serverless::SimpleTable
AWS::Serverless::StateMachine
See the full list here:
https://docs.aws.amazon.com/AWSCloudFormation/latest/UserGuide/aws-template-resource-type-ref.html
Example for SimpleTable
PeopleTable:
  Type: AWS::Serverless::SimpleTable
  Properties:
    TableName: people-table
    PrimaryKey:
      Type: String
      Name: id
    ProvisionedThroughput:
      WriteCapacityUnits: 5
      ReadCapacityUnits: 5
    Tags:
      Department: HR-dpt
      AppType: Serverless
8. AWS Step Functions - Introduction
What are AWS Step Functions?
A service that allows developer build visual workflows for business processes. It orchestrate data flow in an automated environment
Step Functions are based on state machines and tasks.
Example: check if username and email provided are valid, if so, then allow users to open a new Account.
Benefits
-
Build and deploy fast
- Use the Workflow Studio to simply drag-and-drop (🤔 - is this really a benefit?)
- Express complex business logic as low-code, event-driven workflows
- Connect services (aws), systems or people quickly
-
Write less integration code
- Ready to use resources and services available
-
Reliable and Scalable
- Used for small projects as well as large
- Reliable - has built-in try/catch, retry and rollback capabilities for error handling
-
Step Functions are based on:
- State machines
- Tasks (takes input and produces output)
-
State Types (8 state types)
- Pass: pushes input to output
- Task: takes input and produces output
- Choice: allows the user to use Branching Logic based on the input
- Wait: adds delays to State Machine Execution
- Success: has an expected finish-line: dead-end that stops execution successfully
- Fail: has an expected dead-end that stops execution failure
- Parallel: implements parallel branches in execution - use can start multiple states at once
- Mapping (Dynamic): runs a set of steps for every input item
pricing: https://aws.amazon.com/step-functions/pricing/
Creating our first Step Function
AWS Console > Step Functions > Get Started > click on "Design your own workflow here"
Choose authoring method > Write workflow in code > review and accept the "Hello World" example > Next
- Specify details
- define a name
- Permissions: Create new role
- Logging: OFF
- click Create state machine
In the next screen, scroll down and take a look at the "Definition" tab. Once you're happy, click in "Start execution".
After execution, take a look at the "Execution event history".
Adding a Wait State using Workflow Studio
Click in "Edit state machine" and then click in "Workflow Studio". Add a "Wait" step to do nothing for 7 seconds. Execute it and review the results
Set Wait State in the code
"Edit state machine" again, and in the Silence state change Seconds to SecondsPath and set it to "$.waitTime".
Then Start the execution but edit the input to something like this:
{
  "waitTime": 8
}
Run it and review the results.
Edit the SecondsPath again and set it to "$" (a single dollar sign between double quotes) and Start the execution with the default input. Run and review the results.
(it fails because the input of the Silence state is the output of the previous one, which is Hello)
If we delete the Hello.Result: "Hello", the input coming to Hello is going to be the default Result.
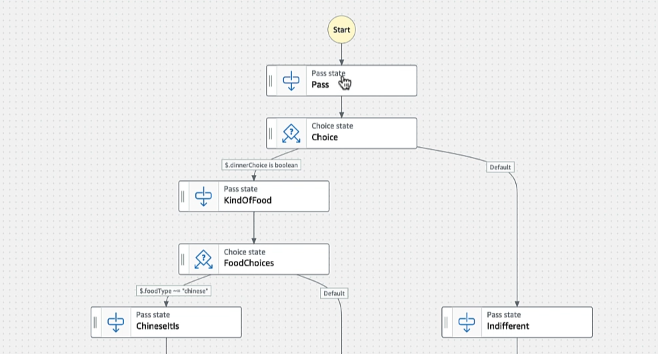
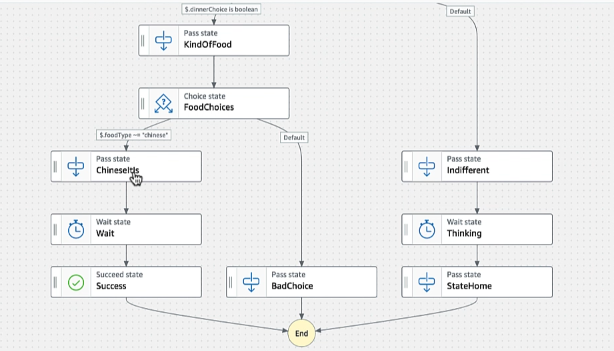
Choice State Example
Choice: Allows the user to use Branching Logic based on the input
Create a new state machine > Design your workflow visually
Pass -> Choice -> Rule #1 -> Add conditions
$.dinnerChoice is of type Boolean
$.foodType matches string "chinese"
Create the following:


9. Step Functions and State Machine Using VS Code Toolkit
Create Step Functions using AWS SAM CLI and VS Code
VS Code > Ctrl+Shift+P > > AWS: Create a new Step Functions state machine
10. Real World Example 1 - S3 Thumbnail Service
sam init
# 1. quick start templates
# 1. hello world
# y. Python and zip
# n. X-Ray
# python-thumbnail

cd python-thumbnail
mv hello_world handler
template.yaml:
Globals:
  Function:
    Timeout: 60
    CodeUri: handler/
    Runtime: python3.9
    Architectures:
      - x86_64
    Environment:
      Variables:
        THUMBNAIL_SIZE: 128
        REGION_NAME: "us-west-2"

Resources:
  CreateThumbnailFunction:
    Type: AWS::Serverless::Function
    Properties:
      Handler: app.s3_thumbnail_generator
      Policies:
        - Version: '2012-10-17'
          Statement:
            - Effect: Allow
              Action: 's3:*'
              Resource: '*'
      Events:
        CreateThumbnailEvent:
          Type: S3
          Properties:
            Bucket: !Ref SrcBucket
            Events: s3:ObjectCreated:*
  SrcBucket:
    Type: AWS::S3::Bucket
handler/app.py:
from datetime import datetime
import boto3
from io import BytesIO
from PIL import Image, ImageOps
import os
import uuid
import json

s3 = boto3.client('s3')
size = int(os.getenv('THUMBNAIL_SIZE'))

def s3_thumbnail_generator(event, context):
  print", event

  # TODO: couldn't this be parsed as JSON?
  bucket = event['Records'][0]['s3']['bucket']['name']
  key = event['Records'][0]['s3']['object']['key']
  img_size = event['Records'][0]['s3']['object']['size']

  if (not key.endswith("_thumbnail.png")):
    image = get_s3_image(bucket, key)
    thumbnail = image_to_thumbnail(image)
    thumbnail_key = new_filename(key)
    url = upload_to_s3(bucket, thumbnail_key, thumbnail, img_size)
    return url


def get_s3_image(bucket, key):
  response = s3.get_object(Bucket=bucket, Key=key)
  imagecontent = response['Body'].read()

  file = BytesIO(imagecontent)
  return Image.open(file)


def image_to_thumbnail(image):
  return ImageOps.fit(image, (size, size), Image.ANTIALIAS)


def new_filename(key):
  key_split = key.rsplit('.', 1)
  return key_split[0] + "_thumbnail.png"


def upload_to_s3(bucket, key, image, img_size):
  # saving image into a BytesIO object to avoid writing to disk
  out_thumbnail = BytesIO()

  # specify file type (MANDATORY)
  image.save(out_thumbnail, 'PNG')
  out_thumbnail.seek(0)

  response = s3.put_object(
    ACL='public-read',
    Body=out_thumbnail,
    Bucket=bucket,
    ContentType='image/png',
    Key=key
  )
  print(response)

  url = '{}/{}/{}/'.format(s3.meta.endpoint_url, bucket, key)

  # save image url to db:
  #s3_save_thumbnail_url_to_dynamo(url_path=url, img_size=img_size)

  return url
sam build
# sam local invoke
sam deploy --guided
# python-thumbnail
# n. confirm before deploy
# y. allow role creation
# default for the rest
Check in AWS Console and check if python-thumbnail was created for the following services:
- CloudFormation
- Lambda Functions
- IAM > Roles
- S3 bucket
Upload an image an go to CloudWatch > Log groups and check if your image upload was logged. You'll see an error in the Lambda function logs.
From here the instructor starts talking about Lambda Layers... I didn't understand very well the concept, just going with the flow...
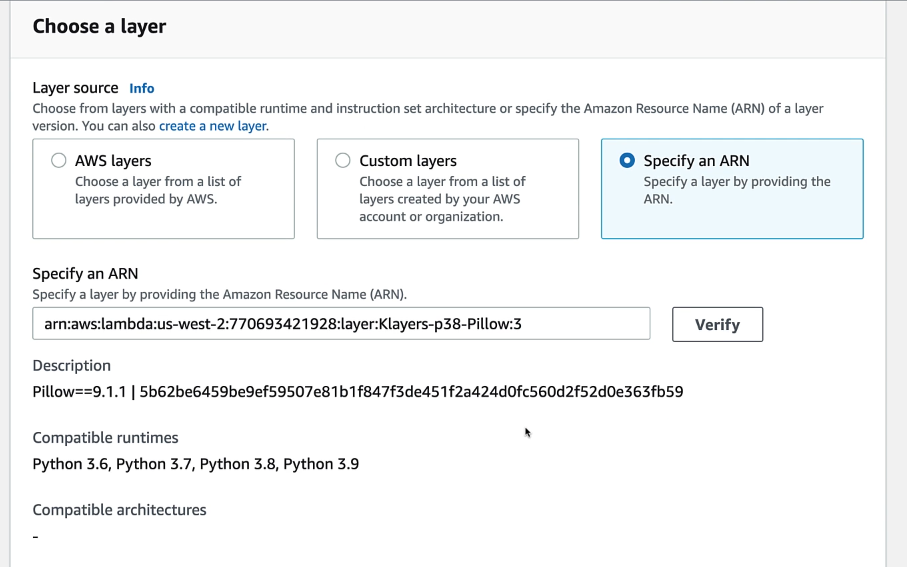
Repo with useful layers: https://github.com/keithrozario/Klayers
Go to the Get latest ARN for all packages in region and choose one that has the Pillow.
In my case I've found it here: https://api.klayers.cloud/api/v2/p3.9/layers/latest/us-east-1/json. And searched for pillow.
Found this:
"arn:aws:lambda:us-east-1:770693421928:layer:Klayers-p39-pillow:1"
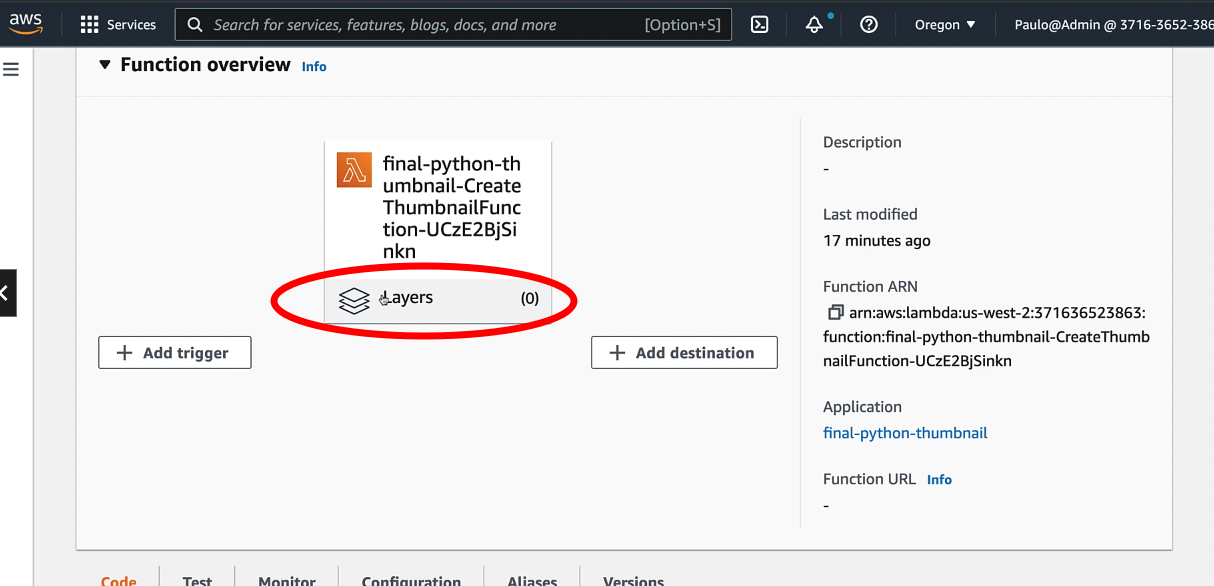
Adding Layer via Web Interface
Go to the Lambda Function and click on Layers and then in the button to add layer.


Adding Layer via template.yaml
Globals:
  Function:
    Layers:
      - "arn:aws:lambda:us-east-1:770693421928:layer:Klayers-p39-pillow:1"
sam build
sam deploy
Check in your AWS Console > Lambda Function if the layer was properly added. Then go to S3 and upload an image again.